Rockwool is a popular step up from the traditional fiberglass used in many homes not just because of its insulating properties. Its resistance to fire, mold, and moisture mark it out as a top performer.
Whether you are renovating, or building a new property, you should be able to bring your project up to code requirements quickly with Rockwool mineral wool insulation. The R-value of Rockwool is comparable with fiberglass, and it handles similarly, but without the same level of irritation.
Installing it in your ceiling, whether in the basement or loft is not a difficult job for someone who can use a tape measure and doesn’t have a problem working from a stepladder.
Here’s everything you need for a successful installation in your ceiling.
What Tools Will You Need?
Besides a tape measure, a sharp craft knife or insulation saw, and a straight edge for accurate cutting, there’s not much else to add to the shopping list. Good access to the working area is essential. It’s worth investing in a cheap step ladder rather than standing on a chair or a box!
Use a safety utility knife with a retractable blade if you can. Once you have stopped gripping the knife handle the blade disappears.
When working with materials over your head, eye protection is advisable to stop any dust, fluff, or other objects from causing irritation. Likewise, it’s usually a good idea to use a lightweight dust mask to protect the airway.
What Should You Do First?
If you are renovating then it is essential that you clear out any old existing insulation and give the entire space a good visual check before you start. Repair any timbers, pipes, vents, or other conduits that need attention.
Before You Start Work on a Basement Ceiling
In a basement ceiling, to really feel the benefit it is a great opportunity to close up any gaps. Block up any old service ducts that might pass through the floor construction. Making the floor as airtight as possible will go a long way toward improving the thermal efficiency of the living space above.
In a basement with rim joists, it is probably a good idea to get them insulated before you go much further. You will definitely feel the benefit, and it isn’t necessarily a big job.
Before You Start Work on an Attic Ceiling
When insulating an attic ceiling with rockwool it is a good idea to use baffles to maintain the airflow in the attic space above the insulation. These 22” rafter baffles are great for keeping offcuts and any other debris from blocking the soffit vents.
Whether renovating or building new, insulate any conduits or pipework before you fill the joists with rockwool. Some may need specialist duct insulation, which will be harder to install after the fact.
Oftentimes it is a good idea to ensure electric cables and conduits are kept exposed and accessible, so bear that in mind when designing any runs. Also, can lights set into ceilings will require a clear area around them to prevent overheating.
Before You Head Out to the Store
Finally, take that tape measure and work out how big an area you are going to insulate. Most rolls of insulation are sold in standard widths to fit between the beams of your ceiling. Lowes has a handy calculator to help you work out how many rolls you will require.
If you are not covering up the insulation with sheetrock, then you may require insulation supports. These come in both 16” and 24” in packs of 100, designed to be held under tension between the beams.
Alternatively, you could use either strapping or you could fix 2 x 1 laths across the ceiling.
How to Install the Rockwool
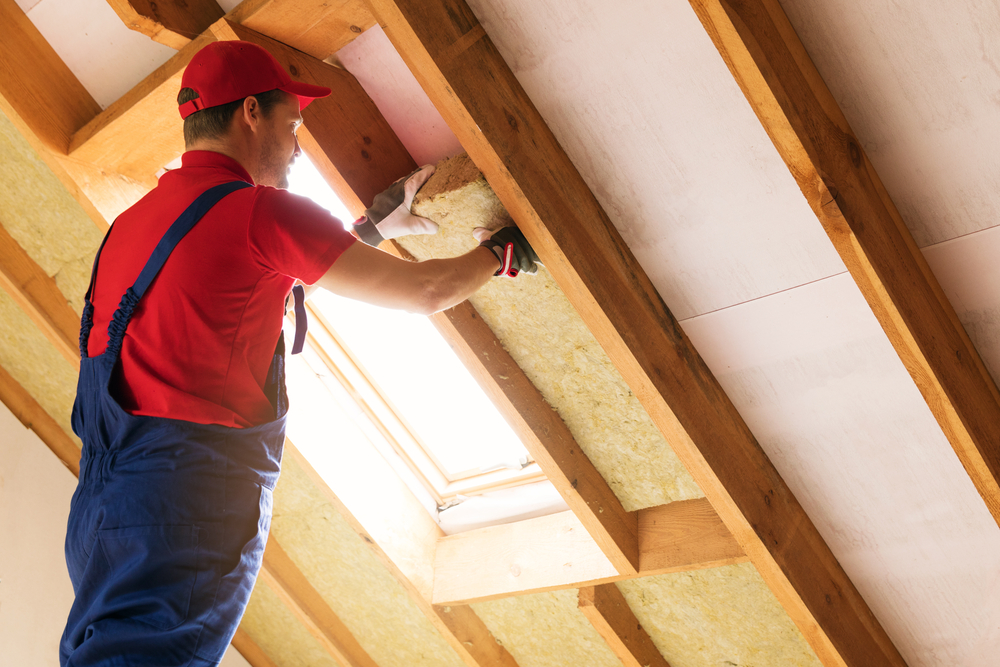
Once you have the area ready, your tools laid out, and your personal protective gear it’s time to make a start. Rockwool comes compressed, so when you open it up allow it to expand to its full size. Lay it out in a clear space and measure the length of the first piece.
The Basic Installation Method
Using the straight edge, compress the point at which you want to make the cut, then draw your knife across the rockwool several times until you are all the way through. This way you will end up with a nice, clean, regular cut.
Stand your step ladder below the area to be insulated and drape one end of the cut piece of rockwool over the top of it. Climb the ladder and lift the rockwool into the space between the beams.
Be gentle, and take pains not to force, or crush the rockwool. While it is a resilient material, crushing can reduce the overall effectiveness of it.
Pull it tight up to the end of the beams. In the basement make sure it is touching the insulation used for the rim joists. In the attic, it is okay for the insulation to make positive contact with the baffles. What you don’t want are any gaps.
The most commonly used product will likely be the ten-inch insulation. Some floor beams come in at 9 ½” to 9 ¾”. The level of compression experienced by the rockwool, if it is closed in with plasterboard, will have a minimal effect on the overall R-value of the product.
Installing Rockwool in a Cathedral Ceiling
In an attic ceiling, this should not be a problem. When insulating simple, single-gable cathedral ceilings, the key issue is maintaining airflow between the top of the insulation and the sheathing. Anything more complicated will usually have an unvented roof assembly.
In a cathedral ceiling with 2” x 10” beams it’s only really able to take 8” rockwool on a roll. The R-value this will give you will only get you to code in climate zone 1.
The answer is to either tack some timber onto the rafters to deepen them, to maintain R-value and ventilation, or couple the rockwool with some rigid foam board.
Joining Rolls of Rockwool Insulation
When joining rolls of rockwool insulation midway across a ceiling make sure your cuts are as neat as you can get them. Rockwool is quite forgiving, so two ends should butt together quite successfully. There’s no need to overlap, one piece over the top of another.
Rockwool is a friction fit, which means that it should fit nicely between the rafters under a little tension. This will give you time to fit insulation supports. Rockwool has greater rigidity than fiberglass and is less likely to slump over time, but it is still advisable to fit supports.


