In a new build construction insulating a ceiling without an attic will all be part of the design remit of the architect responsible for the development, but in an older home what do you do? Chances are that any existing insulation is unlikely to be up to code.
Whether you have a dramatic cathedral ceiling or a skillion or shed roof that requires insulation there are a number of options to consider. Whichever method or material you use, insulating your ceiling without an attic, however, will be essential in achieving the comfort levels you desire.
Here’s our guide to insulating a ceiling without an attic.
What Insulation Can I Use?
Ultimately, the method adopted, i.e. access requirements, other project needs, and aesthetics, will determine which will be the best insulation to use.
There are a few things that need to be considered:
Access
Can the area to be insulated be reached easily? Some cathedral ceilings are so high that a scaffold will be required for part, or all of the works.
Is the area that needs to be insulated accessible, or has it been built over? Some ceilings may already have finished drywall. It might be tempting to cut holes and fill the cavity with blown-in insulation material such as cellulose or fiberglass, however, the risk of a messy drywall blowout can be high.
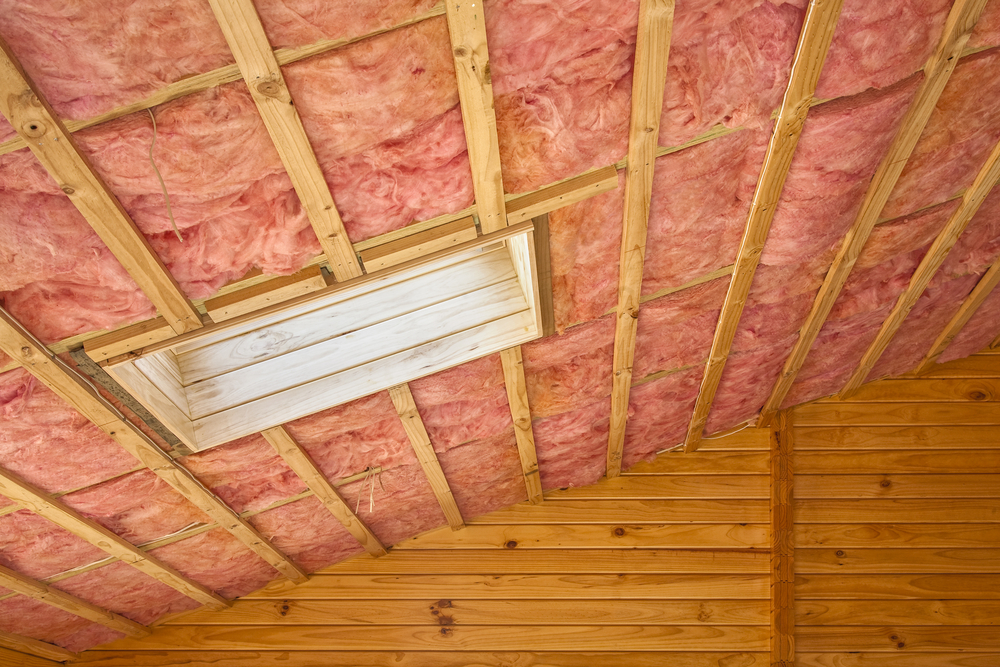
It’s often better to remove the existing drywall, insulate the ceiling between the exposed rafters, and replace the drywall. That way, any damage to the underside of the roof sheathing, if it exists, can be exposed, and repaired.
Air Seal
Air sealing is a key part of ensuring that whatever you use for insulation will be working to its optimum capacity. Getting into every corner, and sealing up any areas that might be problematic is essential whichever climate zone you are in.
In this instance, it would be possible to use several insulation products. The foam board will deliver a high R-value if the beams are narrow, eight inches can deliver R-44, accounting for degradation over time, which is adequate in zones 1 to 4.
From zone five the minimum R-value required rises to R-49, in which case a closed-cell spray foam may be a better option. Closed cell spray foam has the added benefit that it will air seal an area extremely effectively by expanding into every crack, and any small hole or other gap.
Aesthetics
Do you want your ceiling rafters left exposed for aesthetic or practical reasons? If the reason you bought the house in the first place was because of the character provided by the elevated cathedral ceiling with its exposed rafters, then internal insulation is going to be a big no.
Likewise, if there is limited headroom, it might not be practical to add layers beneath the sheathing or add drywall to the rafters.
Air Movement
A key problem to avoid when insulating from the inside of a ceiling space is condensation, and any issues arising from leaks. Mineral wool batts allow moisture to pass through, letting the timber sheathing breathe and dry to the interior.
The general rule of thumb to follow is that at least 40% of the insulation R-value should be installed above the roof deck to avoid condensation issues. Between the roof deck and the shingles, foam board insulation should be used to achieve this.
Most condensation issues are caused by outward air leakage rather than diffusion, or moisture transferring from an external source, which means that having a competent air seal, and moisture control barrier is essential.
How to Insulate an Internal Ceiling Without an Attic
The insulation you can use for your ceiling area depends upon what is already up there. If the rafters are exposed, there is the possibility of insulating between them and over-boarding the ceiling with drywall.
If you already have a drywall ceiling in place, it is always a better job to demolish and expose the sheathing before proceeding with insulation work.
Another option with a vaulted ceiling would be to lose it entirely beneath a flat ceiling, then lay insulation on the new attic space floor.
Should you want to install closed-cell spray foam, or other insulation that also acts as a moisture retarder to the interior, then it is essential to ensure that the roof structure and the roof sheathing are dry.
A moisture content of 12-15% is the maximum level you should allow before sealing the structure from below. It is best practice to carry out work to the internal ceiling area only after any and all work to the exterior has been completed, any leaks remediated, and all repairs complete.
- Once you have organized safe access to the working area, then you can inspect it for any water damage, or spots that might be vulnerable to water or air ingress.
- Protect the floor, or anything that cannot be moved to a safe place, then prepare the ceiling to take the insulation, make any repairs, and air seal as necessary.
- Install your chosen insulation according to the manufacturer’s instructions.
- Unless the insulated area is not in a living space, or part of the thermal envelope of the building, enclose the insulation with drywall or other ignition barrier.
How to Insulate a Ceiling Without an Attic Externally
The external option is probably one of the best methods to employ when insulating a ceiling without an attic, especially if renewal of the external roof covering is required.
The best insulation material to use if following this method will be rigid foam board insulation.
Fitted continuously, i.e. fitting insulation in full-sheets right across the roof deck may mean that you require less depth to achieve code compliance. Check with your local agency to confirm what their expectations would be in this instance.
- Remove the existing roofing material including any underlayment that is not glued to the roof deck. Any underlayment that is securely adhered to the roofdeck can usually be left in place.
- Make any repairs to the exposed roof deck as required.
- Install a continuous air control membrane to the roof deck sheathing, taping all joints with weathertight tape.
- Mark up the membrane as you go so you can locate the rafters later.
- Seal penetrations such as vents, flues, or other services.
- Frame the roof deck to take the required depth of insulation, or fit tapered boards up to the required depth if there is space to do so.
- Install the rigid foam board in layers, taping the joints, and offsetting the boards to stagger the joints.
- Transfer any markings for structural fixings to the foam board as you go in order that you have no difficulty in fixing furring pieces.
- Install the furring pieces (vertical purlins) and decking to take the final roof covering, including underlayment, flashings, water seals for penetrations, etc.


